Category Archives: running|gear

Running in the Hoka One One Mafate Speed, Rapa Nui 2 and Mafate 3

Running up a hill in the Hoka One One Mafate Speed

Since being acquired by Decker Outdoor Corporation in April 2013, Hoka One One has continued to innovate, improving existing designs and introducing many new designs.

Back in February when we were last talking about Hokas, I’d been running in the Mafate 2s and had just purchased a couple of pairs of Mafate 3s. The Mafate 2s were big, mega-cushioned, protective, durable and moderately heavy. I put over 1000 miles on one pair of Mafate 2s and around 300-500 miles on each of several other pairs.

The Mafate 3 improved several aspects of the Mafate design, but gained weight in the process. My Mafate 3s are more than an ounce heavier than my 13.8 oz. Mafate 2s. Heavy or not, I did a lot of training and a few races in the Mafate 3s and overall the shoes have worked well for me.

Add an ounce here and an ounce there and pretty soon you’re running in a shoe that weighs nearly a pound — or more in some circumstances. Although it hasn’t been a problem for me in drought-plagued Southern California, the Mafate 3s can become insanely heavy when wet. A friend that lives on the North Shore weighed them in at a foot-dragging 1.5 pounds each after a wet run!

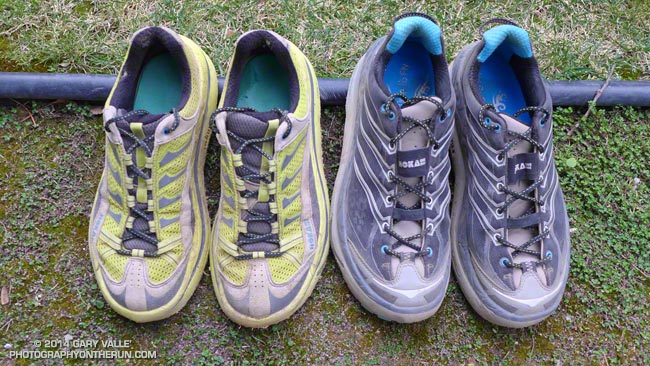
The weight of the Mafate 3s and lower volume toe box were not ideal, so I started looking for an alternative. In April 2014 I got a pair of Hoka Rapa Nui 2s. The Rapa Nui 2s are a far more nimble shoe, with less cushioning, less protection, and a lot less weight than the Mafate 3. My first pair of Rapa Nui 2s weighed in at about 11.2 oz. per shoe.


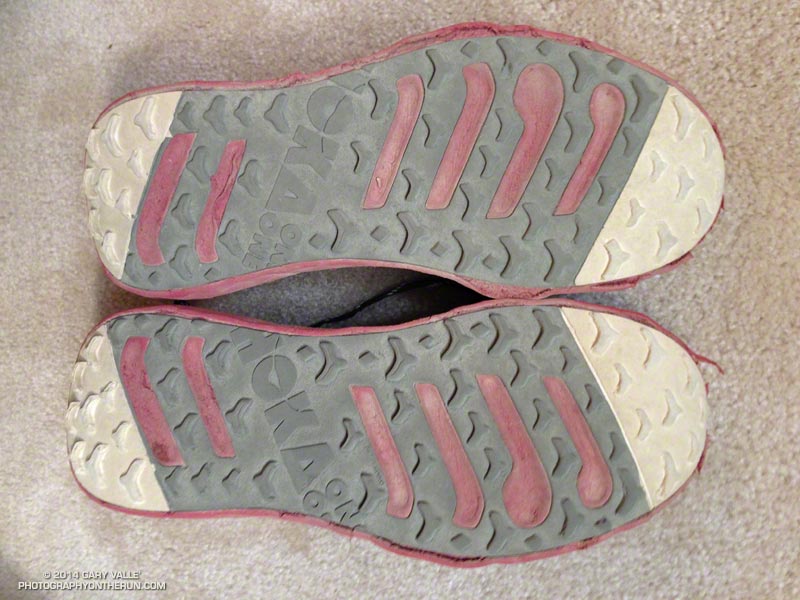
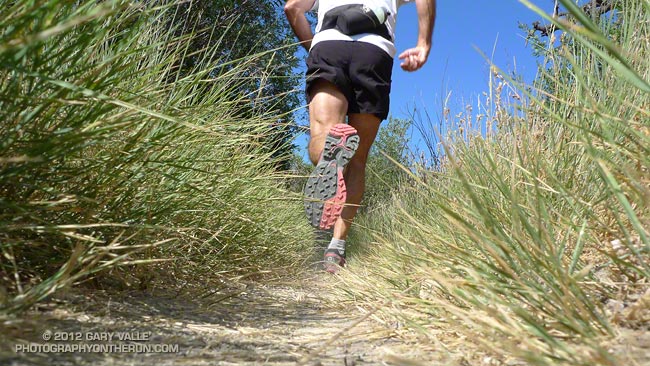
The Rapa Nui 2s fast became by favorite shoe. There are always trade-offs in design and the Rapa Nui 2s are not as durable as the Mafate 3. In normal running on dirt roads and single-track trails I usually get around 300 miles out of the Rapa Nui 2. However, a very rough and steep trail can beat up the shoes very quickly. This pair had about 160 miles on them when we did a run over Mt. Baldy and down the North Backbone trail and then descended Register Ridge on the way back to Manker Flat.

What I needed was a shoe that combined the best features of the Rapa Nui 2 and Mafate 3. And that’s why I tried the Mafate Speed. They are lightweight, protective, not over-sized, have very good cushioning, and are more durable than the Rapa Nui 2. The perfect choice for a long run, right?

I thought so. I’d never had a serious problem with any Hoka, but did with this pair of Mafate Speeds. By mile 9 of the AC100 the ankle cuff of the shoe had worn a bloody sore on my right outer ankle bone. I switched back to Rapa Nui 2s and had no more foot problems.

This experience made me wary of the Mafate Speeds, but I really liked the shoe and recently decided to try them again. And again I had the problem with the right ankle cuff digging into my ankle.


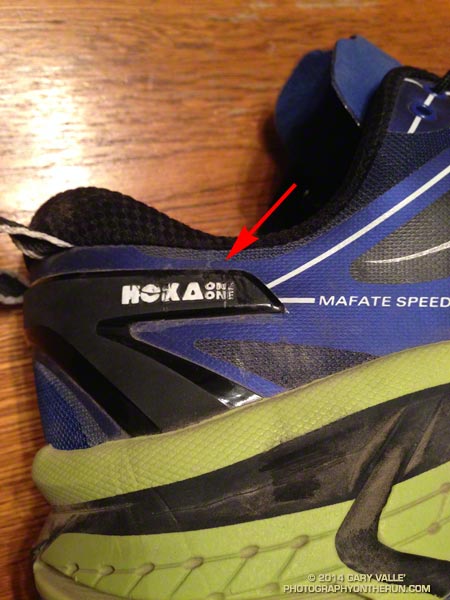
In each case the chaffing was much worse on the right ankle. Why wasn’t the left shoe digging into my ankle? After taking a closer look at the shoes it turned out the external plastic stiffener on the right shoe was much closer to the ankle collar than on the left shoe. This made the minimally-padded collar less flexible.

After I trimmed the stiffener to increase the gap, the problem was mostly resolved. I say mostly because I think the cuff could still benefit from a bit more padding. I’ll have to see how they feel on a 25+ mile run on technical single track, but I think they’ll probably be OK.

Although I’ve had this issue on both pairs of Mafate Speeds I’ve purchased, I checked the Mafate Speeds of a couple of friends and the spacing between the collar and stiffener were more or less equal on their shoes.

So for now, the Rapa Nui 2 is still my go-to shoe for races and my training time is about equally split between the Rapa Nui 2, Mafate Speed and Mafate 3. If the Mafate Speed (modified as necessary) works out OK on longer runs I’ll probably do more training and perhaps racing in the Mafate Speeds. We’ll see!

Update January 23, 2015. I’ve returned the Mafate Speeds and exchanged them for a second pair of the Hoka One One Challengers. The Challenger is very lightweight and comfortable, and it doesn’t have the ‘External TPU Heel Counter’ that (in my case) over-stiffens the ankle collar.

Hoka Mafate 2 Wrapup and Mafate 3 First Impressions

Hoka One One Mafate 2 (left) and Mafate 3 Trail Running Shoes

Hoka One One Mafate 2 (left) and Mafate 3

Update July 1, 2018. I did get 1000 miles out of that first pair of Mafate 2s. As things worked out, the Mafate 3s were superseded by the Rapa Nui 2. The Rapa Nui 2 was a far more nimble shoe than the Mafate 2/3. The Rapa Nui 2 fit well, ran well and generally had good cushioning. In my experience the outsole wasn’t particularly durable. I had 10 pairs of Rapa Nui 2s, finally retiring my last pair in February 2018.

Since purchasing my first pair of Hoka One One Mafate 2s in October 2012 I have run in five pairs of Mafate 2s, and in December 2013 got my first pair of Mafate 3s:

Mafate 2 Pair #1 826 miles (Oct 2012)
Mafate 2 Pair #2 553 miles (Nov 2012)
Mafate 2 Pair #3 510 miles (Jan 2013)
Mafate 2 Pair #4 343 miles (Mar 2013)
Mafate 2 Pair #5 205 miles (Sep 2013)
Mafate 3 Pair #1 108 Miles (Dec 2013)

The Mafate 2s have been used in races ranging from 50K to 110K, for numerous trail runs in the mountains of Southern California, and for day to day training on local fire roads and trails.

Generally, the shoes have performed well and been durable. I’ve had no seam or sole blow-outs or other catastrophic failures. I’ve had no blisters. I’ve used the stock insole in all but one pair.

The Mafate 2 did have a problem that has been prevalent in just about every model of trail running shoe I’ve used — variation in cushioning. With 826 miles on them so far my first pair of Mafate 2s (title photo) have been phenomenal shoes. I may get a 1000 miles out of them. Even though Pair #5 of the Mafate 2s were purchased the most recently and have the least mileage, they have the worst cushioning. They were a decent pair of shoes — I ran the Kodiak 50M and Whiskey Flat Trail 50K in them — they just didn’t last.

Mafate 2 Pair #4 was used for an extravaganza of mountain running which included runs in the Angeles High Country, Sierra and ascending San Gorgonio Mountain three times in four weeks. The rocky, rough trails took their toll on the foam midsole, wearing it ragged and tearing a chunk from one of the toes. I still use the pair from time to time.

Another higher mileage issue with my Mafate 2s was that the fabric lining of the heel collar would wear through. This would leave a rough spot on the collar that wasn’t Achilles-friendly.

Enter the Mafate 3. It’s been my experience that manufacturers often screw up the design of a successful shoe when a new “improved” version of the shoe is released. Especially when said company has recently been acquired by a larger organization. In my opinion the Montrail Vitesse, arguably one of the most popular trail running shoes at the time, was ruined when Columbia Sportswear acquired Montrail.

Happily, this does not appear to be the case with the update of the Mafate 2 and the acquisition of Hoka One One by Deckers Outdoor Corporation. From what I can tell the design changes in the Mafate 3 are spot on.

I got my first pair of Mafate 3s over the holidays. Out of the box the shoes seemed to be more comfortable, with slightly more padding on the uppers and a bit more attention to the comfort of the interior of the shoe.

The Mafate 3 outsole is more narrow in the forefoot than its predecessor and as a result the shoe is a bit more nimble. The heel counter and collar has been redesigned. It fits better, is more comfortable, and looks like it will be more durable. A handy heel pull tab was also added.

One change I didn’t like is the Mafate 3s use Hoka’s speed-lacing system. I don’t have an inherent problem with speed-laces. I’ve used them successfully on a couple dozen pairs of the Salomon XT Wings I, II & III and other Salomon shoes. After one run I replaced the speed-lacing of the Mafate 3s with regular lacing. The substitute laces that came in the box were far too short, so I just used the laces from a retired pair of Mafate 2s. Much better!

The cushioning of my initial pair of Mafate 3s is very good, but only time, miles and multiple pairs will tell if the cushioning is more consistent than in the Mafate 2.

The Mafate 3 runs very well, and with the improvements made in the Mafate 3 it may very well be my favorite trail running shoe to date. I just ordered another pair!

Hoka Madness

Hoka One One Mafate 2

Me: Time for a run!

Legs: Yea –let’s go!

Me: What shoe today?

Legs: Hokas!

Me: Maybe the XT Wings 3? We’re not doing a long run and the trail is fairly technical.

Legs: Hokas, Hokas!

Me: What about the Adidas Response Trail 18? Dependable, consistent shoe… You’ve liked those; we’ve run in the Trail Response a lot.

Legs: Hokas, Hokas, Hokas!

Me: Then let’s go for the XT Wings 2! That’s been your favorite the last couple of years — and the only shoes we’ve used for ultras.

Legs: Hokas, Hokas, Hokas, Hokas!

That’s the typical conversation I’ve been having at my closet door since purchasing a pair of Hoka One One Mafate 2s a few weeks ago. I have run in other shoes, but not much.

The Hokas — really any shoe — can’t be judged based on what they look like. You have to run in them. And I don’t mean a few strides in a store.

To say I was skeptical of the Hoka design would be an understatement. I thought they would dissipate and waste energy. I thought there wouldn’t be sufficient “feel” on a technical trail. I thought they might make an ankle roll more severe. Wrong, wrong, wrong!

The first time I ran in them, they did feel a bit strange. It took running in them a few times to learn how they like to run. I can’t say what adjustments were made — it must have been subtle — but I feel much more efficient on the flat today than when I first got the shoes.

When you run a lot of miles I think there are several components to leg fatigue. The main element is fatigue related to the physiology of endurance, but it seems there is a secondary, underlying fatigue associated with the dissipation of impact shock each time your foot strikes the ground.

Think of an ultra slow motion video of a runner’s leg “reverberating” with the shock of a footfall, then think of each foot striking the ground 5000 times (or more) each hour you run. There has to be a physiological cost.

That’s what I notice the most about running in the Hokas — that this underlying “shock” fatigue is lessened. When I use these shoes on a long run it seems that in the last third of the run my legs can better deal with endurance related fatigue, since they haven’t been pounded as much mile after mile. This also seems to translate into less cumulative fatigue and faster recovery from the run.

I’ve just ordered a second pair!

Update April 14, 2014. I’ve now run in five pairs of Mafate 2s and two pairs of Mafate 3s and have logged about 3000 miles on Hokas. See the related post: Hoka Mafate 2 Wrapup and Mafate 3 First Impressions.

Update April 15, 2013. Since purchasing my first pair of Hokas last October I’ve run three 50Ks (Kernville, Ray Miller, Bandit) and the 68 mile Backbone Trail Ultra and put over 1000 miles on the shoes (multiple pairs). The Mafate 2 has been a superb shoe for running trails, and I’ve hardly used anything else. They would not be my first choice for trail-less cross-country travel in rough terrain or mixed routes requiring (technical) rock climbing, but for trail running they have been great!

What’s the Elevation Gain?

Originally posted July 31, 2009.

“What’s the elevation gain?” is a common question when talking about a trail run, because it makes such a huge difference in the difficulty of the run. A long-standing rule of thumb, Naismith’s Rule, says that the additional time required to gain 1000 ft. of elevation on a run/hike, will be the same as the time to run/hike 8000 ft. (1.5 miles) on the flat. An analysis of fell running records supports this 1 to 8 ratio.

This is not news to anyone who runs or hikes hilly trails. The first thing I check when evaluating a new race or run is the elevation gain. All the technology we have for recording and analyzing trail runs is remarkable, but it can sometimes result in wildly inaccurate claims about the elevation gain of a course.

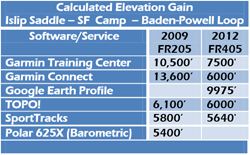
The table to the left lists the elevation gain calculated by various software and services for the the same course using GPS tracks from a Garmin Forerunner 205 and Forerunner 405. The course is the Islip Saddle – SF Campground – Mt. Baden-Powell loop in the San Gabriel Mountains.  SportTracks elevations were corrected using pkan’s Elevation Correction Plugin and SRTM elevations data in 2009 and NED 1/3 arc second DEMs in 2012. SportTracks elevation data smoothing was set to 55.

Calculations of elevation gain have improved since 2009. One reason is newer GPS chips generally produce higher quality tracks. Another is the methods used to calculate elevation gain/loss have improved and more accurate elevation datasets have become readily available and integrated into software such as SportTracks and services such as Garmin Connect.

So which of these elevation gains is the closest to reality? Fortunately, it’s fairly easy to do a low tech sanity check of these high tech results. All that is required is to get out an USGS topo map — either electronically or on paper — and do a little arithmetic.

Let’s see. From South Fork Campground (4560′) to the summit of Mt. Baden-Powell (9399′) is about 4839′. But there are a couple of small descents on the way up so we add another 240′ giving a total to the top of Mt. Baden-Powell of 5079′. It’s mostly downhill from Baden-Powell to Islip Saddle, but there are a couple of hills. The main one is a 370′ climb on the PCT up and over the shoulder of Throop Peak. There’s also another 100′ climb near Mt. Burnham, and if you stop at Little Jimmy Spring another 60′ climb. This gives a total of 5609′. Adding in a fudge factor of 100′ for very small climbs that were not included in the total and the result is a reality-checked elevation gain of about 5700′. Comparing this total to the computed elevation gains in the table, the actual gain might be as much as 6000′, but it’s not likely to be 7500′. And there’s just no way the gain is 9975′!

The title photograph is from the Momyer Trail on San Gorgonio Mountain.

Related post: Hitting the (Big) Hills of Southern California

Bulldog Trail Runs Bans Toed Running Shoes

Heads up if you were planning to run the 2012 Bulldog 50K or 25K in toed running shoes. The following new rule is specified on the Bulldog Race Rules page:

“Barefoot sports shoes or toed running shoes will not be permitted to be worn at the Bulldog Trail Runs; no exceptions!”

Last year the U.S. Army banned toe shoes because of “lack of conformity with the Army’s conservative professional appearance.”

Salomon XT Wings 3 Trail Running Shoe – First Impressions

Salomon XT Wings 3 Trail Running Shoe

Somehow I’ve managed to avoid reading any hype, advertising or reviews related to the Salomon XT Wings 3. To date I’ve put about 60 miles on my first pair — including a couple of 16-20 mile runs in the San Gabriel Mountains. Following are my first impressions of this $140 shoe.

Altogether I’ve run in about 20 pairs of XT Wings and XT Wings 2. I run almost exclusively on trails. Racing is not my focus, but I run a few ultras each year, as well as several 15K-30K races. Most weekends I do a longer run in the mountains. I have a D-width, neutral, high-arched foot. My foot strike varies, but tends to be more mid-foot than on the heel.

Wow, was I surprised when I pulled these shoes out of the box! Rather than a tweaked version of the XT Wings 2, the XT Wings 3 looked like a completely new shoe — kind of a blend of the Salomon SpeedComp, SpeedCross and XT Wings 2. My overall impression was one of increased precision, performance and versatility.

After weighing the shoes (25 oz/pair – size 9), I compared the outsoles. Big changes here. Gone is the wider heel and platform that has characterized the XT Wings line. The sole now sports chevron-shaped lugs, similar to the SpeedCross. In my opinion this is a more versatile design, and traction should be improved on a variety of surfaces. The lugs should also help forefoot cushioning. I also noted the density of the heel strike pad appears to have been increased.

Twisting the shoe along its length, the XT Wings 3 appeared to be stiffer torsionally. There’s a new toe cap, and since I’ve already kicked a couple of rocks, I can attest that it is more protective than earlier versions. Another change is the heel cup is now more anatomically shaped.

The fit of the XT Wings 3 is comfortable, but more snug than the XT Wings 2. Perhaps because of my high-arched foot, the reduced mid and forefoot volume in the XT Wings 3 is more evident. It fits me more like the SpeedComp or SpeedCross. I have to carefully adjust the speed-lacing to ensure there is not too much pressure on the top of my foot. The difference in the volume is particularly noticeable after running in the XT Wings 3 several days and then switching back to the XT Wings 2.

So how did the XT Wings 3 run? Very well! Other than having to carefully adjust the speed-lacing, I had no issues with the shoe. Cushioning, comfort, traction and protection all seemed good. It’s difficult to evaluate in just a few runs, but the more narrow platform of the XT Wings 3 may make it a little less roll resistant on uneven surfaces than the XT Wings 2.

There are always trade-offs in design, and runners are VERY particular about their shoes. One shoe cannot be ideal for all runs and all runners. I have to put more miles on XT Wings 3 to see where it works best for me. Based on my initial impressions, I think I would tend to use the XT Wings 3 on faster paced runs where precision and performance are important. I still have several pairs of the XT Wings 2, and the longer the run, the more likely I will be to use the XT Wings 2 — a shoe that has worked exceedingly well for me.

Related posts: XT Wings, XT Wings 2