Category Archives: climbing

Two Sides of Strawberry Peak – Spring 2021 Update

Josephine Peak and Mt. Lukens from the northwest ridge of Strawberry Peak

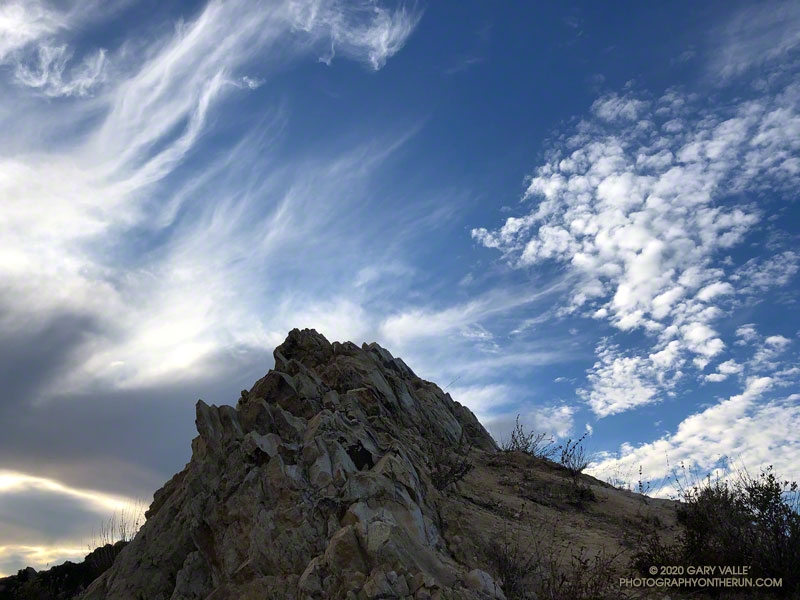
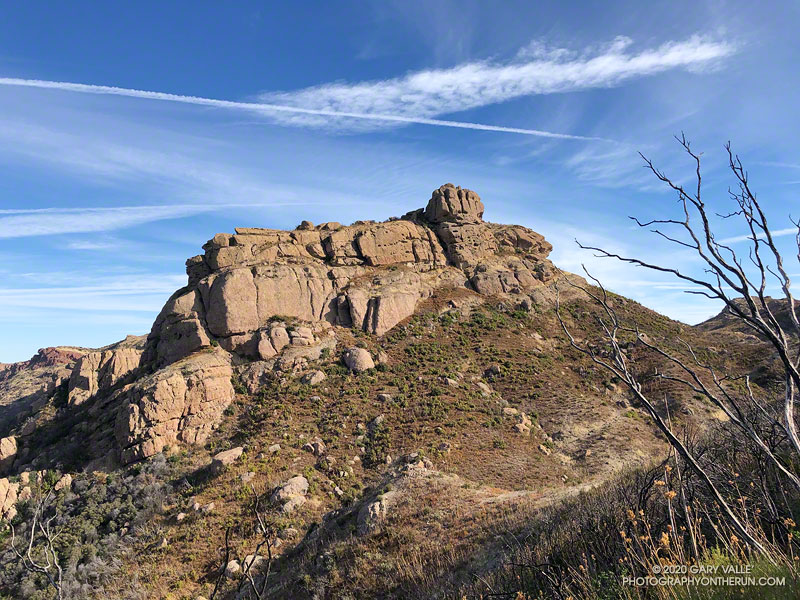
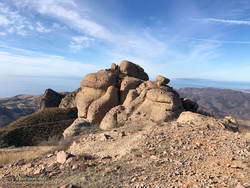
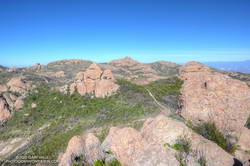
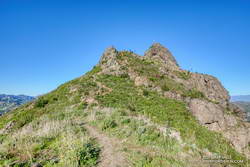
The photo above — of Josephine Peak — is the reciprocal view of this photo of Strawberry Peak. The photo of Strawberry from Josephine shows the dogleg approach along the ridge that connects Josephine Saddle to the northwest ridge of Strawberry Peak.

Strawberry has always been popular, but because of the Pandemic and fire closures, there has been an increase in the number of people doing the peak. Not having done the peak for a couple of years, I was curious to see if the condition of the use trail on Strawberry’s northwest ridge had changed.

Google Earth image of Strawberry Peak from Josephine Peak, with GPS track of route from Josephine Saddle to summit
Google Earth image of Strawberry Peak from Josephine Peak, with GPS track

Given my early start, I was surprised to find the small parking area for the Colby Canyon Trail nearly full. I don’t know where all those people went, because I passed only one small group on the way to Josephine Saddle, and I didn’t see anyone between Josephine Saddle and the summit. There was a group on the summit, but they had hiked the trail from Red Box.

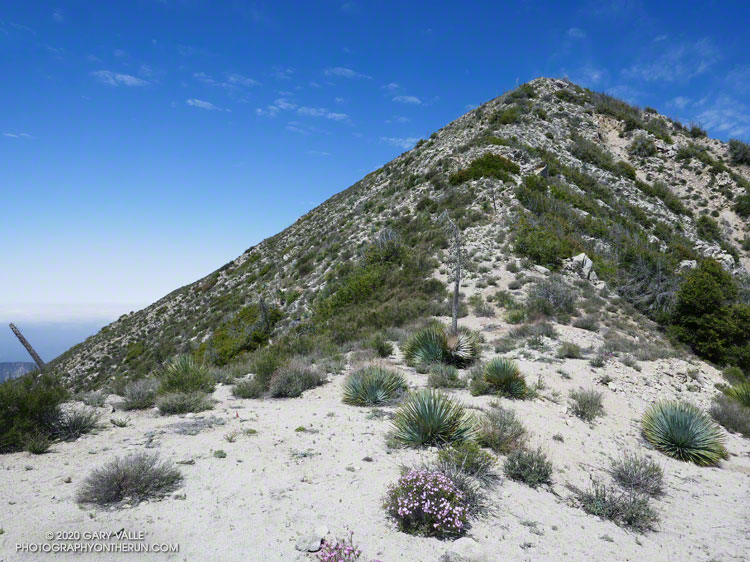
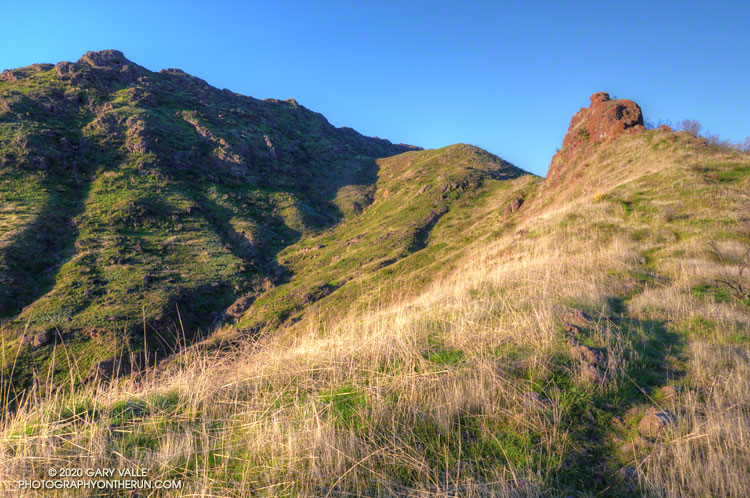
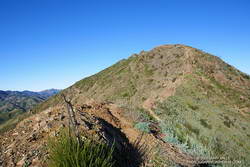
The last time I did the loop over Strawberry was April 2019. At that time sections of the use trail along the ridge leading to the upper northwest ridge of Strawberry were badly overgrown. This time around, increased usage has generally improved the path along the approach ridge. Plus, there has been some work done on the section of trail that was the most overgrown. However, to benefit, you have to stay on the trail. It wanders all over the place, and if you get impatient, you’ll be fighting your way through thick, thorny brush.

Upper northwest ridge of Strawberry Peak.

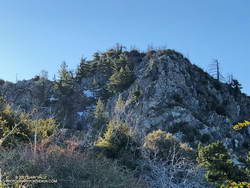
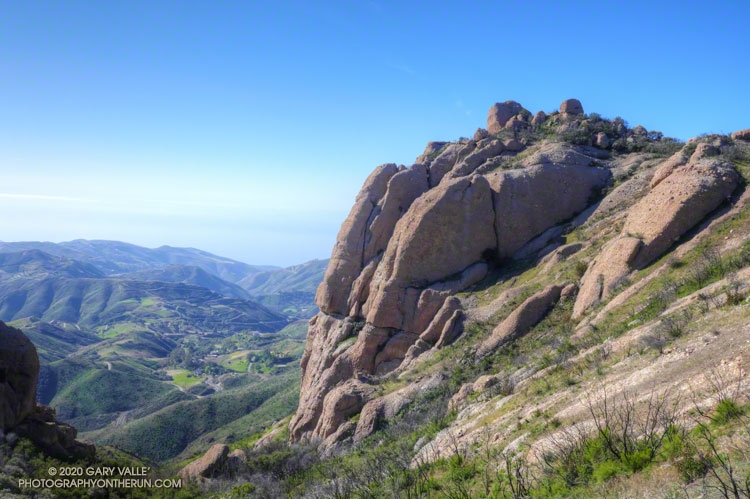
There was a little patchy snow on the steep, deeply shaded, north face of the peak. The snow was generally left of the normal rock climbing route up the northwest ridge. The patch or two on the route were easily avoided. Early or late season, this more technical section can be like a deep freezer. Today, it was cool, but comfortable. As mentioned in other posts, the steep, upper part of Strawberry’s northwest ridge requires good route-finding and some rock climbing skill. It is important to stay on route.

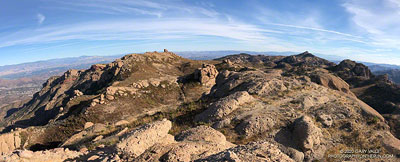
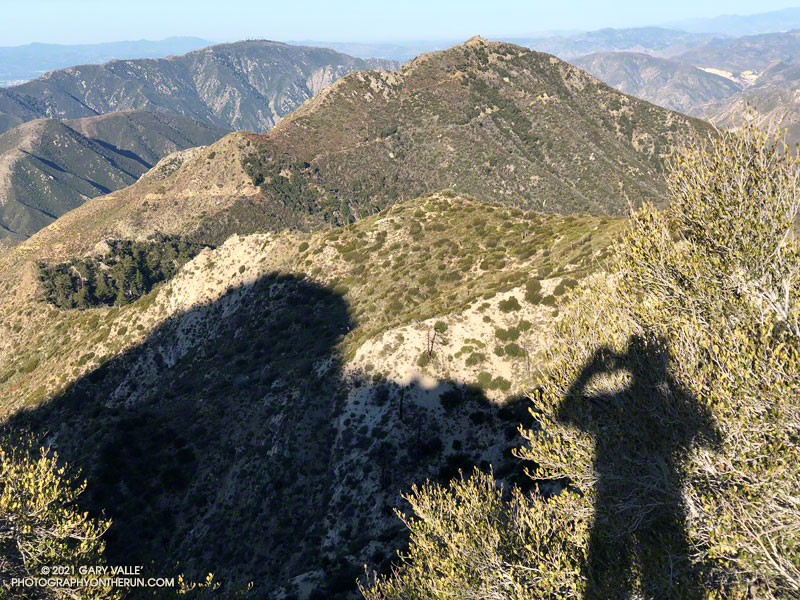
The steep section of the ridge ends a little below the top of Strawberry. I paused there for a moment to enjoy the view… Was that music I heard coming from the summit?

It was. The group that was on the summit was kind of encamped there. It looked like they might be a while, so I just said hi, and started down the east side of the peak.

I expected a lot of people to be on the trail up Strawberry from Red Box. It was busy, but seemed about normal for a Sunday in Spring with idyllic weather. There were fewer large groups coming up from Red Box than in April 2019.

Upper West Fork near Red Box following the Bobcat Fire
Upper West Fork near Red Box from the Strawberry Trail. Mt. Wilson is in the distance.

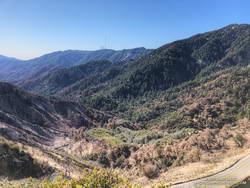
At Red Box I stopped to take a look at how the 2020 Bobcat Fire had impacted the upper part of the West Fork drainage. There was a substantial fire scar on the left side of the canyon, but the right side of the canyon looked better than I expected. An upcoming post will include an interactive 3D visualization of the Soil Burn Severity in the Bobcat Fire area, along with the GPS tracks of some popular trails.

For the first time in a long time, I didn’t encounter any mountain bikers on the Gabrielino Trail between Red Box and Switzer’s. There were plenty of tire tracks, so I must have been between groups. I did encounter two misplaced hikers. They stopped me and asked how much farther it was to the falls. Unfortunately, they had gone the wrong direction on the trail from Switzer’s, and were several miles from Switzer Falls.

At Switzer’s, I chugged up the access road to Hwy 2, and then ran on the verge next to road back to the Colby Trailhead. Somehow, more cars were packed into the small parking area.

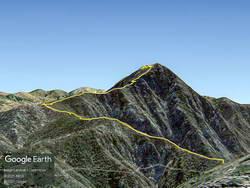
Starting and ending at the Colby Trailhead, the loop is a little over 12 miles with about 3200′ of elevation gain/loss. Starting at Clear Creek adds about a mile to the loop. Some prefer to do it as keyhole loop, returning to Josephine Saddle from Lawlor Saddle using the Strawberry and Colby Trails. I haven’t done it that way, but the mileage looks to be only slightly less than the full loop through Red Box.

Some related posts: Strawberry Peak

Looking for Boney Bluff

Boney Bluff from the Backbone Trail

Every time I’ve run the Chamberlain segment of the Backbone Trail, I’ve looked at the intriguing rock formation near the top of the trail and wanted to climb it. Looking a bit like an aircraft carrier that’s run aground on a mountain ridge, it’s one of the most prominent peaks along Boney Mountain’s western escarpment. Named “Boney Bluff” by rock climbers, several sport climbing routes were established on the southeast side of the peak in the early 2000s.

Located just northwest of the junction of the West Tri Peaks Trail and the Backbone Trail, the peak is visible from many points in Pt. Mugu State Park. According to lidar-based 1-meter resolution 3DEP data, its elevation is 2985′, which is slightly higher than the 3DEP elevation of nearby Exchange Peak.

Boney Mountain plateau.
Boney Mountain plateau. Click for larger image.

Boney Bluff is one of many small peaks and rock formations that are found across the Boney Mountain plateau. Comprised of a fused mishmash of volcanic breccia, the rock quality of these formations ranges from very good to quite bad. Seemingly solid handholds or footholds can break, and because of the way the rock erodes, low-angle sections are often littered with granular rocks that can be very slippery.

Boney Bluff from the east.

Having climbed the Western Ridge on Boney Mountain, I approached Boney Bluff from the north, via the Tri Peaks Trail. My route climbed a slope to the east side of the peak, then traversed right to the base of a jumbled face with several oddly eroded ledges. A short, steep crack and grassy ramp provided access to the ledges above. NOTE: There may be a better way to climb the peak. I was trying to do a relatively direct route and avoid bushwhacking. The route is somewhat manky, but worked for me.

Summit block of Boney Bluff
Summit block of Boney Bluff.

The high point of the peak is on top of a summit block that caps the “island of the carrier.” Many of the formations on Boney Mountain have summit blocks, and these are often the most difficult part of the climb. Rule #1 involving summit blocks: Don’t climb up anything you can’t 100% for sure climb down! This one looked like it might be tricky, but with careful route-finding was pretty straightforward.

Because Boney Bluff is perched on the edge of the Boney Mountain plateau, on a clear day there are outstanding panoramic views of Pt. Mugu State Park and the Boney Mountain area from its summit. Today, the visibility was excellent and Mt. Baldy was visible, 75 miles to the east.

Lidar-based 3DEP Elevation Estimates of Some Boney Mountain Peaks
Lida-based 3DEP elevation contours of Boney Bluff. Click for a larger image.

The resolution of the 3DEP Elevation Data is very impressive. While checking the elevation of Boney Bluff, I also noted the 3DEP elevation of several other peaks in the Boney Mountain area. For more info about 3DEP see this U.S.G.S. website.

  • Sandstone Peak 3116′
  • Tri Peaks 3039′
  • Boney Bluff 2985′
  • Boney Crest 2974′ (Accessed via Western Ridge or Cabin Trail)
  • Exchange Peak 2969′
  • Big Dome 2934′
  • Boney Peak 2849′ (Both summits)
  • Inspiration Point 2811′

Some related posts: Looking for Boney Mountain, Looking for Boney Peak

Condor Peak Out and Back Adventure Run

East Ridge of Condor Peak

“Condor Peak-Elevation 5430 ft. – 1 Day
By Vogel Canyon Trail.
Drive Big Tujunga Canyon road to Vogel Flat
Ranger Station and park auto. Hike trail starting
opposite station for short distance up Vogel Canyon,
then around mountain slope west of Big Tujunga
Dam to summit of Condor Peak. Return by
same route. Carry water and cold lunch. No fires
permitted. Total hiking distance, 12 miles.”

— Trails Magazine, VOL 1 NO. 4, Trail Trips, Autumn 1934

The relocation of Big Tujunga Canyon Road in the 1950s shifted the starting point, and some other details have been updated, but the route from Vogel Flat to Condor Peak is pretty much the same as it was in 1934.

It’s telling that hikers of that era would have estimated the round-trip distance to Condor Peak at 12 miles. This was probably a “feels like” estimate of distance, based on time. The mileage in the description is far less than the presently accepted distance of 15.5-16.0 miles. Back then, the trail would have been relatively new and in better condition than it is now. Even so, they must have been fit and fast!

The “Vogel Flat” trailhead for the Condor Peak Trail is now a little to the east and above its original location, and is not obvious. If traveling up-canyon on Big Tujunga Canyon Road, it is just past Vogel Flat Road, directly across the highway from the second turnout on the right.

Note: Even in the best of circumstances, hiking, running, or riding a mountain trail involves risks. The nature of the terrain this trail navigates is such that the risk from falling while running, hiking or riding, crossing washouts, and from heat-related illness is high. There are some sketchy sections with large drop-offs. In particular, below Fox Mountain there was a very exposed washout at the top of a steep sandy chute that required extra care to cross.

As was the case last week on the Stone Canyon Trail, it looked like some sections of the Condor Peak Trail had been trimmed in the last year or two. And like the Stone Canyon Trail, the trailwork ended partway to the peak. In this case, it ended about two-thirds of the way to Condor Peak, as the trail turns northwest and contours around Fox Mountain. The bushwhacking wasn’t nearly as bad as on the Stone Canyon Trail, and things improved once up on Fox Divide.

Prior to this outing, I’d only attempted to do the peak in December and January. There is almost no shade, and the trail traverses several south and south-east facing canyons that act like solar ovens. The last time I did Condor Peak, in December 2007, the overnight low at Clear Creek had been 34 degrees and the high 52. That day was chilly in the shade, but about right in the sun. Today, the overnight low at Clear Creek was 63 degrees and the high 75. It was warm, but with an early morning start, was OK.

It was a relief to finally reach Fox Divide. In 2007 we climbed Fox Mountain from this point. Today I was running alone and thought the ascent of Fox, as short as it is, might result in me running short of water. I didn’t do Fox, and as things worked out, I finished the last of my water about a half-mile from the end of the run. (There is a spring, but the flow was just a trickle.)

I had not reread my notes from 2007 and had conveniently forgotten the nature of the final 1.5 miles between Fox Mountain and Condor Peak. I won’t spoil the adventure here.

There was a fairly well-defined path up the steep, east ridge of Condor Peak. As in 2007, the red register container was on the western summit. The eastern summit, marked by a robust yucca, is about the same height. Viewed from the summit of Condor Peak (5440+’), Mt. Lukens (5074′) was clearly lower in elevation.

Like last Sunday on the Stone Canyon Trail, I did not see anyone on the way up or down the Condor Peak Trail. Ironically, just a couple miles away, there were over a hundred cars parked along Big Tujunga Canyon Road at the Gold Canyon/Trail Canyon access.

Here’s a 3D Cesium interactive view that shows a GPS track of my route up and down the Condor Peak Trail to Condor Peak. The view can be zoomed, tilted, rotated, and panned. Placemark and track locations are approximate and subject to errors.

And here are a few photos taken along the way.

Some related posts: Condor Peak Trail Run, Back to the Stone Canyon Trail

Looking for Boney Peak

Boney Peak from the Backbone Trail

Along with Sandstone Peak, Tri Peaks, and Exchange Peak, Boney Peak is an officially named peak that is part of the Boney Mountain massif. The peak is located about 0.5 mile southwest of Sandstone Peak and is easily accessed from the Backbone Trail.

I’d climbed the other peaks in the area, and run past Boney Peak many times, but never scrambled to its summit. Getting to Boney Peak from the Wendy Drive trailhead was pretty much the same as doing Sandstone Peak. I took the “escalator” up the Western Ridge of Boney Mountain to Peak 2935 and then ran over to Tri Peaks. From there, I followed the Tri Peaks Trail to the Backbone Trail, near the Mishe Mokwa Trail junction.

Tri Peaks from the top of Boney Peak

The use trail to the top of Boney Peak leaves the Backbone Trail about a mile from the Tri Peaks/Mishe Mokwa Trail junctions. Other than a little brush, it’s fairly easy to get to the peak’s boulder-strewn summit. There was a red register can stashed in the rocks. (The title photo of Boney Peak was taken where the use trail begins.)

The actual high point of the peak is atop, a large, exposed summit block. Various trip reports describe the easiest route up the summit block as class 3. That seems about right. Although relatively straightforward, the use of handholds is necessary, and a fall would ruin your whole day. Like many such boulders, it is easier to climb up than to climb down, and someone without rock climbing experience could easily find themselves unable or unwilling to climb down.

California poppy blooming along the Chamberlain Trail segment of the Backbone Trail in February
California poppy blooming in February!

From Boney Peak, I returned to the Backbone Trail and headed west, down the Chamberlain Trail and on to the Danielson Multi-Use area. A few brightly-colored, yellow-orange poppies were already blooming along the trail. The rest of the run was the usual jog up Sycamore Canyon to the Upper Sycamore Trail, and then back to Satwiwa and Wendy Drive.

Here’s a 3D Cesium interactive view that shows a GPS track of my route. The view can be zoomed, tilted, rotated, and panned. Placemark and track locations are approximate and subject to errors.

Some related posts: Looking for Boney Mountain, After the Woolsey Fire: Boney Mountain and Pt. Mugu State Park, Boney Mountain’s Western Ridge

Ladyface After the Woolsey Fire

Northeast ridge of Ladyface mountain

In January, on my way to do a run on the Backbone Trail, I stopped for a moment along Kanan Road to see if the ridges on the east side of Ladyface peak were still accessible. I didn’t see any obvious access issues and made a mental note to get back and do the peak soon.

“Soon” turned out to be earlier this February. While the route and the climbing were about the same as the last time I did the Ladyface Loop, the mountain itself had changed dramatically.

Nearly all of the chaparral on the peak was incinerated by the Woolsey Fire. Compare the title photo above to this photo taken before the fire. Before the Woolsey Fire, the last time Ladyface was burned in a wildfire was in the October 1982 Dayton Canyon Fire — a span of 37 years.

Bush sunflower along the northeast ridge of Ladyface

Like other areas burned in the Woolsey Fire, Ladyface is recovering. It will just take time. December’s rains have turned the mountain green, laurel sumac and other chaparral plants are crown-sprouting, and the season’s first wildflowers are blooming along the sun-warmed ridges.

For those with appropriate skills and experience, Ladyface is a relatively straightforward and enjoyable climb. But some of the things that make it interesting are the very things that can make it sketchy.

Some climbing with the hands is necessary — and that includes going down the mountain as well as going up. The route-finding isn’t always obvious, and the rock isn’t always sound. The volcanic rock is sharp, and some sections of the trail on the east/southeast ridge are very slippery — especially if wearing smooth-soled shoes.

Below are a couple of photos of the east/southeast ridge.

East/Southeast Ridge of Ladyface mountain
Click for a larger image and more info.
East/Southeast ridge of Ladyface mountain.
Click for a larger image and more info.

The loop packs a lot of adventure into its 2.5 miles!

Some related posts: Ladyface Loop, Ladyface the Long Way