Category Archives: photography

American Kestrel Pair in Upper Las Virgenes Canyon Open Space Preserve

American Kestrel Pair in Upper Las Virgenes Canyon Open Space Preserve

Tuesday is usually a “short run day” for me. On Tuesdays, I usually run a mile or so west on East Las Virgenes Canyon fire road, and then fork left onto another dirt road that descends a short distance, and then climbs steeply up to Lasky Mesa. Once on Lasky Mesa, I check what’s blooming, crawling or flying in the area.

Today, as I was leaving Lasky Mesa, I scanned a grove of valley oaks for a pair of northern harriers I’ve been seeing on the mesa. I didn’t see the harriers, but another pair of much smaller raptors caught my eye.

The male and female American kestrels were perched at the top of a valley oak tree, about 25 yards away. At that distance, they were difficult to positively ID, and nearly beyond the reach of my compact camera.

Usually a kestrel will fly from a perch as soon as it spots me, but this time the pair cooperated. I stopped running, grabbed the camera from my pack, and took a couple of photos. The female kestrel is perched above the male.

Related post: Under a Falcon’s Eye

Looking for Boney Peak

Boney Peak from the Backbone Trail

Along with Sandstone Peak, Tri Peaks, and Exchange Peak, Boney Peak is an officially named peak that is part of the Boney Mountain massif. The peak is located about 0.5 mile southwest of Sandstone Peak and is easily accessed from the Backbone Trail.

I’d climbed the other peaks in the area, and run past Boney Peak many times, but never scrambled to its summit. Getting to Boney Peak from the Wendy Drive trailhead was pretty much the same as doing Sandstone Peak. I took the “escalator” up the Western Ridge of Boney Mountain to Peak 2935 and then ran over to Tri Peaks. From there, I followed the Tri Peaks Trail to the Backbone Trail, near the Mishe Mokwa Trail junction.

Tri Peaks from the top of Boney Peak

The use trail to the top of Boney Peak leaves the Backbone Trail about a mile from the Tri Peaks/Mishe Mokwa Trail junctions. Other than a little brush, it’s fairly easy to get to the peak’s boulder-strewn summit. There was a red register can stashed in the rocks. (The title photo of Boney Peak was taken where the use trail begins.)

The actual high point of the peak is atop, a large, exposed summit block. Various trip reports describe the easiest route up the summit block as class 3. That seems about right. Although relatively straightforward, the use of handholds is necessary, and a fall would ruin your whole day. Like many such boulders, it is easier to climb up than to climb down, and someone without rock climbing experience could easily find themselves unable or unwilling to climb down.

California poppy blooming along the Chamberlain Trail segment of the Backbone Trail in February
California poppy blooming in February!

From Boney Peak, I returned to the Backbone Trail and headed west, down the Chamberlain Trail and on to the Danielson Multi-Use area. A few brightly-colored, yellow-orange poppies were already blooming along the trail. The rest of the run was the usual jog up Sycamore Canyon to the Upper Sycamore Trail, and then back to Satwiwa and Wendy Drive.

Here’s a 3D Cesium interactive view that shows a GPS track of my route. The view can be zoomed, tilted, rotated, and panned. Placemark and track locations are approximate and subject to errors.

Some related posts: Looking for Boney Mountain, After the Woolsey Fire: Boney Mountain and Pt. Mugu State Park, Boney Mountain’s Western Ridge

Ladyface After the Woolsey Fire

Northeast ridge of Ladyface mountain

In January, on my way to do a run on the Backbone Trail, I stopped for a moment along Kanan Road to see if the ridges on the east side of Ladyface peak were still accessible. I didn’t see any obvious access issues and made a mental note to get back and do the peak soon.

“Soon” turned out to be earlier this February. While the route and the climbing were about the same as the last time I did the Ladyface Loop, the mountain itself had changed dramatically.

Nearly all of the chaparral on the peak was incinerated by the Woolsey Fire. Compare the title photo above to this photo taken before the fire. Before the Woolsey Fire, the last time Ladyface was burned in a wildfire was in the October 1982 Dayton Canyon Fire — a span of 37 years.

Bush sunflower along the northeast ridge of Ladyface

Like other areas burned in the Woolsey Fire, Ladyface is recovering. It will just take time. December’s rains have turned the mountain green, laurel sumac and other chaparral plants are crown-sprouting, and the season’s first wildflowers are blooming along the sun-warmed ridges.

For those with appropriate skills and experience, Ladyface is a relatively straightforward and enjoyable climb. But some of the things that make it interesting are the very things that can make it sketchy.

Some climbing with the hands is necessary — and that includes going down the mountain as well as going up. The route-finding isn’t always obvious, and the rock isn’t always sound. The volcanic rock is sharp, and some sections of the trail on the east/southeast ridge are very slippery — especially if wearing smooth-soled shoes.

Below are a couple of photos of the east/southeast ridge.

East/Southeast Ridge of Ladyface mountain
Click for a larger image and more info.
East/Southeast ridge of Ladyface mountain.
Click for a larger image and more info.

The loop packs a lot of adventure into its 2.5 miles!

Some related posts: Ladyface Loop, Ladyface the Long Way

Malibu Canyon to Saddle Peak, Topanga Lookout, Calabasas Peak, and the Secret Trail

Corpse Wall and other rock formations along the Backbone Trail near Saddle Peak.

The range of temperatures had been remarkable. At the Secret Trail trailhead in Calabasas, where I left my car, it had been a balmy 60 degrees. Near the start of my run from the Tapia Trailhead in Malibu Canyon, it had been a very chilly 32 °F. Near the end of the run, the temp topped out at 79 °F. That’s SoCal Winter running!

On the way to Saddle Peak, I was surprised to see how wet it was on some sections of the Backbone Trail. There has been very little rain this January, but marine layer dew, the trail’s north-facing aspect, the low sun angle, the canopy of bays and oaks, and relatively cool temps have kept the trail damp. In places it looked like it had just rained yesterday.

Elevation profile for trail run from Tapia to Secret Trail via Topanga Lookout and Ridge.

Because there’s about 1000′ less elevation gain, I usually do this run in the opposite direction, starting on the Secret Trail and ending at Tapia. This is the route described in the venerable guidebook, 50 Trail Runs in Southern California. But I’d run it in that direction a bunch of times — so here I was, chugging up the Backbone Trail, nearing the end of a 2600′, seven-mile climb from Tapia to Saddle Peak.

The area around Saddle Peak is yet another spectacular section of the Backbone Trail. (There are so many!) Just west of the peak, the trail winds through a narrow passage with massive sandstone rocks on either side. As the trail levels out, there is a short spur trail to the peak’s antennae-infested summit.

Even if a little obstructed, views from the top extend to Catalina, Boney Mountain, Mt. Pinos, and Mt. Baldy. Sometimes San Gorgonio Mountain and San Jacinto Peak can be seen beyond Mt. Baldy. The round trip to the summit of Saddle Peak adds about 0.8 mile. The eastern summit is slightly lower, but no antennae obstruct the view.

Getting to Saddle Peak from the Tapia trailhead is relatively straightforward, if a bit strenuous. Getting to Calabasas Peak and the Secret Trail from Saddle Peak is not as simple.

The “normal” way to get from Saddle Peak to Calabasas Peak would be to run back down the Backbone Trail to the Stunt High Trail and then follow that trail to the parking area on Stunt Road. Calabasas Peak Mtwy is across the highway and slightly downhill (west) of the parking area and leads to Calabasas Peak and the Secret Trail.

If doing the regular route, note that the Stunt High Trail crosses Stunt Road twice on the way down. In each case turn right and follow the road east about 100 yards to pick up the trail on the other side of the road. There are also various side trails to avoid.

Calabasas Peak from Topanga Lookout Ridge.

I had been planning to do the regular route, but as I was returning to the Backbone Trail from Saddle Peak, it occurred to me there was a way to avoid backtracking. Instead of turning left on the Backbone Trail and descending to the Stunt High Trail, I turned right and continued east, past the water tank, to the Lois Ewen Overlook. From there, I ran over to the Topanga Lookout and then scrambled down Topanga Lookout Ridge to Calabasas Peak Mtwy.

This option is more adventurous, but requires good route-finding skills and being comfortable clambering down a rocky ridge. This 3D Cesium interactive view shows a GPS track of my route. The yellow track is today’s route. The red track is the usual route between the Backbone Trail and Calabasas Peak Mtwy. The view can be zoomed, tilted, rotated and panned. Placemark and track locations are approximate and subject to errors.

Scrambling down the ridge put me at “The Bench,” at the junction of Calabasas Peak Mtwy and Red Rock Road. This is a little more than a mile from Calabasas Peak. Once on Calabasas Peak, it was only about 0.6 mile to the top of the Secret Trail, and from there about 1.3 miles of mostly downhill running to the trailhead.

With about 4000′ of gain over 14 miles, it was a demanding route, with challenging route-finding and a fun scramble down a rocky ridge. Here are a few photos taken along the way.

Some related posts: Topanga Lookout Loop, Plus Saddle Peak; Secret Trail Variations; Secret Trail to Calabasas Peak

In the Distance: San Gabriel Mountains From Lasky Mesa

Mt. Baldy and the San Gabriel Mountains from Lasky Mesa.

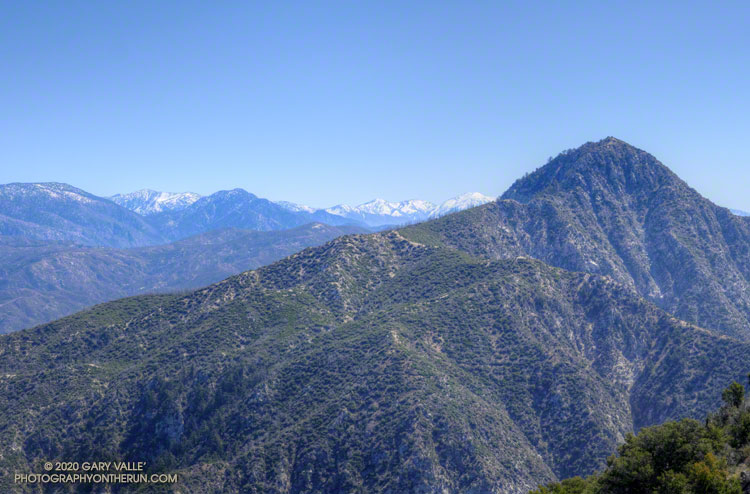
On Winter days when the sky is clear and the visibility is good, the view of the San Gabriel Mountains from Lasky Mesa can be surprisingly detailed. In those conditions you’ll sometimes see a brilliant patch of white in the distance, through a gap in the mountains.

There are a number of peaks in the San Gabriels that are high enough to be snow-covered. Which one is it?

I suppose I could have used an app to ID the peaks on the skyline, but another way would be to draw a line on a sufficiently detailed map and “connect the dots.” The line would be drawn from Lasky Mesa, through the gap, and then extended to a mountain that would have snow. An easy way to do that is to use the “Measure” tool in Google Earth.

The title photo was taken from what used to be the helipad site on Lasky Mesa. (The work currently occupying that space was the subject of a previous post.) The gap in the mountains is the saddle between San Gabriel Peak (left) and flat-topped Mt. Markham.

Drawing the line in Google Earth reveals that the snow-covered mountain is Mt. San Antonio (10,064′) — generally referred to as Mt. Baldy. The peak is about 60 miles distant. Here’s a closer view with some of the peaks identified.

Lake Lasky Mesa

Lake Lasky Mesa - Photography by Gary Valle'

Hidden away in the central highlands of Lasky Mesa, and not found on current maps, the “lake of the four hills” is shrouded in mystery.

Perhaps the result of earth movement or some other upheaval, the hills and lake seemingly appeared overnight. They are the latest in a series of perplexing formations to suddenly materialize on the site.